
How To Work With Cardboard
I am very pleased today to bring you a tutorial on how to work with my favorite-est crafting material of all:
C.A.R.D.B.O.A.R.D !!!!

I've been working with cardboard even longer than I've been sewing and working with fabric. One of my most-used toys as a kid was a roll of scotch tape, with which I assembled all kinds of structures with found objects around the house. Whenever we had access to cardboard, which wasn't as often as I wished, and certainly nowhere as often as I have now, I was practically in heaven. Because I never had formal cardboard-builing lessons or read any books on how to work with cardboard, I imagined that everyone else also just winged it with cardboard. The fun has always been in the designing, experimenting and making. But based on the many requests I've received from readers, I'm thinking maybe I assumed wrong.
So today I am happy to share with you as much as I know about cardboard.
First, though - lest you think I'm any good at it - let me show you some realcardboard art - here, here, and here. When I look at work like that, I think fabric issoooooooooo last season.
Righto - now that we're all properly demoralized inspired, let's begin!
Why Work With Cardboard?
Duh. It is SUPREME.
Just in case that doesn't convince you, let's list other lesser reasons:
- It is (in most cases) free.
- It appeals to the environmentally-conscious, pro-recycling parts of our human nature.
- It is disposable - toss it back into the recycling bin when you're done playing.
Where Can I Get It?
Anywhere. And everywhere.
- It sneaks into your home each time you bring groceries and sundries in from the store. Look for it housing cereal and diapers, on the backs of writing tablets, in between folded bedlinen.
- If you know of people who've recently moved into your neighborhood, bring them a casserole and then beg them for their moving boxes - these are often made of exceptionally sturdy cardboard.
- Bring your kids to supermarkets and members' clubs like Sam's Club and Costco, and ask the staff for cardboard boxes and the giant sheets that line their pallets. They are usually only too happy to oblige, especially when you say it's for a children's craft project.
- Conduct surveillance on your husband's (I'm stereotyping here) home improvement adventures and ferret away all the packing boxes from lawn edging, shower doors, etc.
- Wait for your freezer/TV/computer to die and then order replacements based on which ones come in the best cardboard boxes.
- Save all the shipping boxes that come in the post.
- Buy them - but only as the last resort, after scavenging all other free sources - from office supply stores.
How Do I Build A Cardboard Stash?
Case 1: If you are lucky enough to live in a huge house:
- Find a secret room.
- Throw every cardboard box you find into it.
Case 2: If you are unlucky and have to think about space:
- Cut open and flatten every cardboard box you find.
- Slide them under beds. Or between the mattress and box spring. Or behind the headboard.
Save silly little things like the inner tubes of toilet paper, paper towels and wrapping paper.


and the occasional fancy paperboard (compressed layers of paper) gem that comes along:

Somewhere along the way, you might need to decide if you're more of a cardboard box refashionist or a bona fide cardboard freak. Here's what I mean:
The Cardboard Box Refashionist:
You work primarily with cardboard boxes to turn them into things that retain the structure of the box. So stuff like cars, puppet stages, ovens, personal rocketships, that sort of thing. When you see a cardboard box, your first thought is what you could make out of it that has those dimensions. You love that the box already has corners and a flap and sides to work around. You're probably blind to regular sheets of cardboard lying around, or you think, "Hm, I wonder if I could use that as a cutting mat. Or maybe my kids might like to color on it."
If you were working with fabric, you'd be the one cutting up men's shirts and turning them into girl's frocks while retaining the button plackets, bottom hems and collars.
The Bona Fide Cardboard Freak:
You will use any cardboard to make anything. When you see a cardboard box, your first thought is to check the flute size and then cut it up into flat shapes and make something. You hate, absolutely hate how the pre-existing fold lines of the flaps limit you to cutting out pieces of certain sizes. Whenever you see large pieces of cardboard, you froth at the mouth and begin to have visions of furniture and entire houses for victims of national disasters.
If you were working with fabric, you'd be the one buying fabric in ridiculously large yardage, with plans to sew every single garment in the most recent issue of Burdastyle.
Most of us vascillate between both roles, depending on what we can get our hands on.
Any kind, silly! They are all supreme. But some are more supreme than others.
Here are some common types:
Thin, cereal-box type-
this is good for projects that require a lot of folding and rolling. Pick this for making cones, tubes and tiny boxes.

Thicker, back-of-writing-tablet type -
doesn't roll well, but folds nicely when scored (will discuss this later). Structures made from this keep their shape better than those made from the cereal-box variety.

Single Wall Corrugated Cardboard -
single layer of flutes (those wavy things) between two layers (called liners) of cardboard.

which comes in different thicknesses. Check out the size of the flutes - the smallest flute (somewhere in the middle of the stack) is in a USPS priority mail box.

Double Wall Corrugated Cardboard- double layer of flutes:

See - compared to the single wall cardboard below it.

There does exist Triple Wall Corrugated Cardboard, but I haven't seen it yet (drats). Updated in Oct 2011: Yes, I have! Hurrah! Here it is:

Now this is one of my particularly precious stash treasures: it is extra thick, extra strong, surprisingly light

and has the prettiest pattern of corrugation. Quite different from the regular corrugated cardboard. Almost honey-comb like. I wish I knew what it was called. We found two of these strips in a box containing some household appliance, and used the first one for a ramp for matchbox cars. It lasted years.


Then there are the other kinds of 'cardboard' like paper board, cardstock, poster board but you know those already.
What Tools Do I Need?
To each his/her own. I'll share what I use:
For cutting: kitchen shears and a craft knife/NT cutter/X-acto knife/box-cutter.
For gluing: hot glue gun, UHU craft glue, masking tape and packing tape. I've seen UHU glue sold in Michaels.

What Makes Corrugated Cardboard So Strong?
Corrugated cardboard gets its strength from the flutes between its liners. They dictate how you can manipulate the cardboard itself, but when used correctly, can add a lot of strength to a structure.

First, and most obviously, avoid including pre-existent creases, unless you want them for a particular reason. These are weakened areas in the cardboard.

Second, make fold, bend and roll lines parallel to the flutes.
Let's come back to that in a minute. First, let's work with regular cereal-box cardboard:
Suppose you want to join two little pieces at an angle, like the walls of a tiny box. First, you'd need to make a little overlapping tab for applying some adhesive. Sorta like a seam allowance.
For it to bend, you'd need to score a fold line. This just means you scratch a line with something thin that will weaken the surface but not cut through it. Like the back of a knife blade.

Then you can make a neat fold.

You'd put some glue on the underside of the folded tab

and attach it to another piece.

You could score and fold in any orientation because cereal box cardboard has no corrugation.
With corrugated cardboard, you'd have to pay attention to how the flutes are lined up.
Folding/Bending:
You'd want your fold line to be parallel to the flutes- this way you only distort one or two flutes in the fold and the rest of the piece remains strong. If the cardboard is especially thick, you might need to score the fold line first.

Suppose you needed to fold in the perpendicular direction. With very thick corrugated cardboard, you might not even be able to bend it in this orientation. So you'd score

before folding. Notice the upper liner and the flutes have had to split in order for the fold to happen. This means the fold is only as strong as that bottom liner layer i.e. much weaker than if you'd folded it parallel to the flutes, as we did earlier.

Rolling
is like making a series of gentle bends to attain a curve. Again this is done with the bends parallel to the flutes.

This is a thin piece of corrugated cardboard rolled in the wrong direction (perpendicular to the flutes) - there is a horrible, uneven mess of creases in the middle.

One of the questions I've most often been asked is how I cut cardboard.
If the cardboard is thin and small, I use scissors:

If the cardboard is thin but large and hard to manouevre with scissors, I use my craft knife on a cutting mat (yes, the same one I use for fabric). I draw the knife along a ruler edge for straight cuts, or free-hand around curves. This is especially helpful in cutting out holes and windows.


If the cardboard is thick, I use the same knife as a saw. I hold the cardboard away from the cutting board and use an up-down sawing motion all around the outline.

Assembling Without Glue:
If you are working with a cardboard box, you can assemble the usual box-way, for instance, tucking in the flaps:

or taping them down.

You could also make simple slot joints:


Assembling With Glue:
When making flat structures (like cardboard cookies and that fraction puzzle), Elmer's White Glue works OK. It's especially safe for children. When making 3D structures however, I don't use Elmer's White Glue. It's strong enough for wood, yes, but it dries slowly and requires either a clamp or someone to actually hold the pieces together in place overnight. If I am joining two pieces that don't require special, fiddly positioning, I use a hot glue gun. It's fast and strong. Otherwise, I use my UHU craft glue - it's fast, but not instant like hot glue. I can slide things around to position them for a few seconds before it dries.
If you remember, attaching thin cardboard together at their edges requires an overlap tab. Thick corrugated cardboard, having an actual edge of its own, doesn't require a tab. Glue can be applied directly to the edge to adhere it to a surface. Here is a series of pictures to show you how a curved surface was glued to a flat circular base - this was Rapunzel's Tower from here:


Ah, the million-dollar question.
I don't know. You'd have to look around you and get inspired, I guess. Look at architecture. Look at toys. Let the ideas percolate for a few months. Then sketch them out. Anything made of cardboard can be translated into wood for a sturdier and more permanent product. The converse is true - anything made of wood/plastic can be replicated in cardboard. Even furniture!
If you're new to cardboard, start with the cereal box kind of projects - cut out masks, make little teepees, retractable telescopes, indoor boomerangs, little cars for Playmobil.
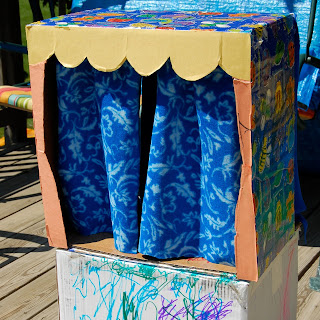
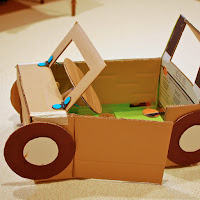
If you're ready for something 3D, grab a box and cut holes in it. Turn it into a fishtank, a cage, a puppet stage, a washing machine, a castle.
Ask your children what they think the box should become. I guarantee you they will have very strong opinions. It doesn't matter if everybody starts out making a featureless tunnel out of boxes and calling it a space shuttle. Over time, you will find the motivation to add things to it - a round window, wings, a flip-up door, maybe even wiggly little control knobs. Sometimes make toys for your kids, but also make toys with your kids, so they get to see you think, plan, build and develop an idea. Fun has so many levels!
Here is a roundup of some old cardboard projects - child's play (literally!) compared to those real works of art I linked to earlier. I don't usually include templates or patterns because the size of the product depends entirely on the size of the cardboard sheet/box I have to work with. And much as I'd like to build giant cardboard structures, I've been banned by the husband due to space constraints. Click on each of the pictures to take you back to (where available) the original posts.


No comments:
Post a Comment